A lighting project rarely fails because the fixtures were wrong. It fails because information is lost between the people who measure the room, the people who choose the products, the people who install them and the people who have to sign the result off. This is the full sequence we run to keep that information intact — from the first site drawing to the 3D walkthrough that shows the client what they are buying.
Why the order matters
Ask any integrator where a project went wrong and you will rarely hear "the beam light was too dim". You will hear one of these:
- The design was drawn before anyone measured the ceiling.
- The fixture schedule was priced without checking what the truss could carry.
- The installation team received a product list, not a drawing, and improvised on site.
- The client approved a specification they could not visualise, and only saw the result after it was installed.
Each of those is the same failure. A decision was taken one stage too early, on information that did not exist yet.
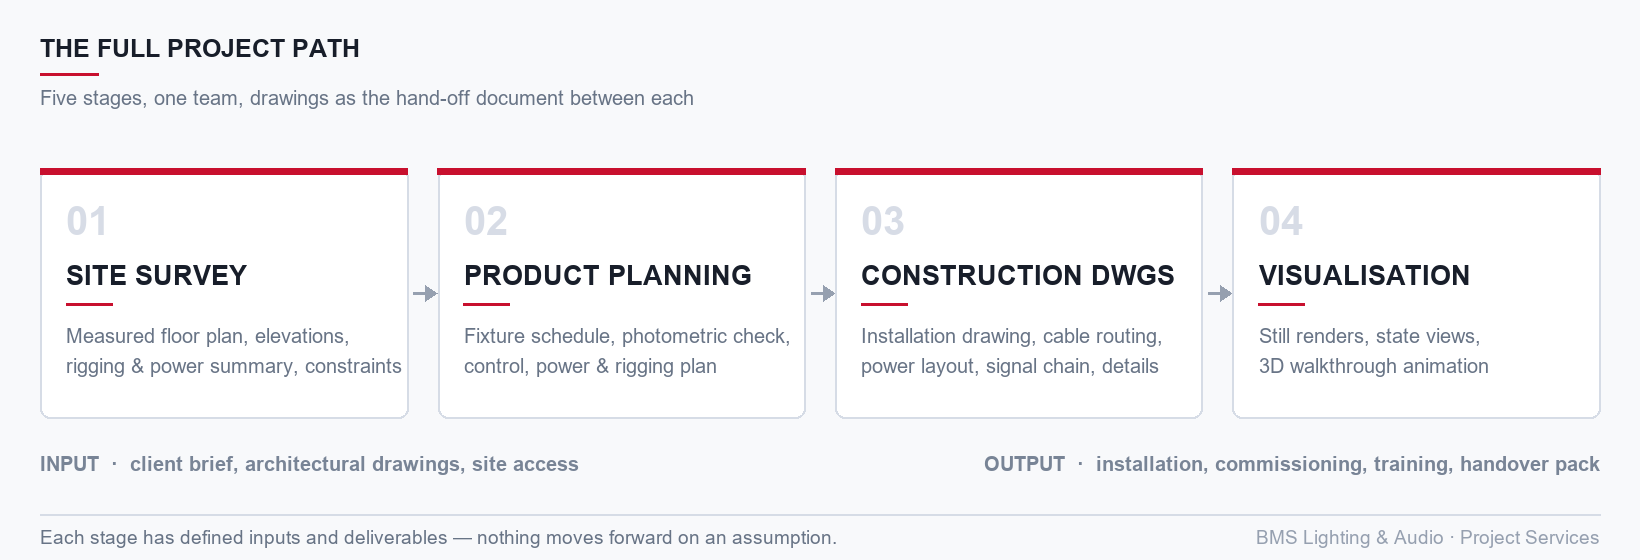
The stages below are ordered so that every decision has its inputs already on the table. Running them in sequence — with one team holding the thread from the first measurement to the final switch-on — is what keeps a project predictable.
Stage 1 — Site drawing: getting the room on paper
Everything downstream depends on this stage, which is why we do not accept "we will confirm dimensions later".
What we need from the site: architectural drawings if they exist, the intended use of the space, and access for a survey visit.
What we record:
- Room dimensions, shape and ceiling height — measured, not assumed
- Ceiling and roof structure, existing rigging points and their load capacity
- Available power, distribution room location and spare capacity
- Positions for console, dimmer room, network nodes and cable routes
- Obstructions: HVAC ducts, sprinkler heads, structural beams, decorative ceilings
- Daylight contribution and the ambient light level the design has to cut through
- Sight lines from the audience and camera positions, where relevant
What you receive: a measured floor plan with elevations and sections, a power and rigging summary, and an explicit list of constraints — the things the design will have to work around.
A 200 mm error in ceiling height is easy to fix at this stage. At the fixture-hanging stage it can change the entire optical design, or the truss specification, or both.
Stage 2 — Product planning: turning a room into a system
With real dimensions and real constraints, the specification becomes arithmetic rather than guesswork. This is where a lighting package stops being a list of products and becomes a system.
What you receive:
- Fixture schedule — model, quantity, position, purpose and accessorisation for every unit
- Photometric check — throw distance against beam angle, achieved illuminance and uniformity at the working plane, and whether the number of fixtures actually covers the area
- Control architecture — console, network, nodes and universes, with the spare capacity marked explicitly
- Power and signal distribution — total connected load, circuit and breaker plan, cable sizing, distro positions
- Rigging plan — loads per point and the hardware needed to carry them
- Commercial view — the schedule is built so that optional items are visibly optional, and the client can see what a reduced scope would cost them in performance
Two points we make on almost every project. First, fixtures are selected by position and purpose, not by output. The widest, punchiest fixture in a range is usually the wrong choice for a front-of-house position where a clean, even face light is what is actually needed. Second, we mark the spare capacity rather than quietly consuming it: a system specified with no headroom left cannot absorb the extra two fixtures the client will inevitably want six months later.
Stage 3 — Construction drawings: making it buildable
A product schedule tells you what to buy. Construction drawings tell a contractor how to build it — and they are the difference between a design that reaches the stage and one that quietly mutates on site.
What you receive:
- Installation drawing — the position, mounting method, orientation and height of every fixture, dimensioned
- Cable routing — containment, trunking and conduit routes for power and signal, coordinated with other trades
- Power layout — which fixture hangs on which circuit, and which breaker feeds which distribution board
- Signal chain — console to network to node to fixture, drawn as a chain so faults can be traced logically instead of by trial
- Detail drawings — rigging nodes, brackets, safety bonds and any non-standard fixing
- Interface conditions — what the main contractor has to provide: embedded fixings, load-bearing points, access panels, and the sequencing around other works
This is also the stage that protects the client's budget. Every change made on a drawing costs a revision. The same change made on site costs labour, access equipment and often a second visit.
Stage 4 — Visualisation: renders and 3D walkthrough video
Drawings and schedules are precise, but they are not persuasive — and the person signing the contract is often not the person who reads drawings.
What you receive:
- Still renders from the key viewpoints: the house view, the stage view, the entrance, and any position the client considers critical
- State renders where relevant — the room in conference mode, in performance mode and in standby, because the same fixture rig often has to serve several functions
- A 3D walkthrough animation showing the fixture movement, beam travel, colour changes and the transitions between scenes
The value here is not decoration. Three things happen when a client sees the design as an image rather than a specification:
- Layout problems become obvious before anything is ordered — a fixture that covers a projection screen, a beam that lands in the audience's eyes, a wash that does not reach the back of the room.
- The person who controls the budget can evaluate the design directly, instead of relying on a technical colleague's summary.
- The design is documented in a form that survives a change of project manager.
Stage 5 — Delivery, commissioning and handover
- Factory stage — every unit is powered, burned in and function-checked before packing; the same procedure applies to export orders
- Installation support — supervision or full installation, depending on the contract
- Commissioning — addressing, patching, focus and the initial cue programming, so the system runs from the day it is handed over
- Training — operator training on the console and the fixture functions, for the people who will actually be running the room
- Handover pack — as-built drawings, addressing charts, equipment schedule and operating notes
Stage 6 — After-sales
The project does not end at switch-on. Spare parts, warranty support, remote diagnostics and long-term maintenance are part of the package, and the same team that specified the system remains the point of contact afterwards. A fixture that is ten years old and still supported is worth more to a venue than a cheaper one that becomes an orphan in year three.
What we need from you to start
| What | Why it matters |
|---|---|
| Architectural drawings or a site survey | Everything downstream depends on real dimensions |
| Intended use and event types | Determines fixture mix, not just quantity |
| Ceiling height and structure | Sets the beam angles and rigging method that are physically possible |
| Available power and distribution location | Determines load limits and circuit design |
| Budget range and its priority | Lets us propose a scope that is achievable, not aspirational |
| Key dates and deadlines | Drives the drawing schedule and production lead time |
| Who signs off the design | We need to know whose approval the render has to win |
Send us whatever you already have — a sketch, an architectural PDF, a photograph of the room with a tape measure in it. A drawing does not have to be complete to be useful; it needs to be honest about what is missing.
This is a service, not a sales document. BMS takes on the site survey, product planning, construction drawings and visualisation as a single package — which means the team that measures your room is the same team that specifies it, draws it, supplies it and supports it afterwards. If you would rather handle part of the process in-house, we will work with what you have and fill the gaps.
One team, from first measurement to final switch-on
Most of the cost in a lighting project is not the equipment. It is the rework caused by information moving badly between stages — a specification written from a guess, a drawing that does not match the room, a client who approves something they cannot see.
Run as one sequence, by one team, with the drawings as the contract between every stage, that risk largely disappears. You get a system that was specified for your room, a buildable set of drawings, a picture of the result before you commit, and a supplier who is still there when you need a spare part.
If you have a project in front of you — a theatre, a lecture hall, a club, an outdoor stage or a venue that is being refurbished — send us the drawings you have and the intended use, and we will come back with the first stage of the sequence.
Have a project in front of you? A theatre, a lecture hall, a club, an outdoor stage or a venue being refurbished — send us the drawings you already have and the intended use, and we will come back with the first stage of the sequence.